|
S2ENGINE HD
1.4.6
Official manual about S2Engine HD editor and programming
|
|
S2ENGINE HD
1.4.6
Official manual about S2Engine HD editor and programming
|
In S2ENGINE HD animations are always blended together, using weighted interpolations. The result of blending interpolation is a new animation that contains a percetage of every blended animation, basing on its weight. The weight of an animation can have values from 0.0 to infinite. This means that, given a set of two or more animations, more big is the weight of an animation more this animation will influence the final result.
AnimationCrossFade function can be used to smoothly play transition between animations in a given time interval. In other words, when applying CrossFade of an animation, its weight is gradually brought to 1.0 value while all other animations weights are gradually brought to 0.0 value.
From version 1.4.6 there are two new type of animation: 1D and 2D blended animation.
It is an animation that blends two or more source animations basing on a single float parameter. The float parameter values can range from 0 to 1. 0 value means the first animation source completely visible and all others completely invisible, value 1 means the last animation source completely visible and all others completely invisible.
Source animations are equally distributed along the float parameter values intervall, for example if you have 3 source animations the first animation blends from 0 to 0.5, the last from 0.5 to 1.0 and the middle animation reaches maximum value in 0.5 and minimums in 0 and 1, as showed into the following image:
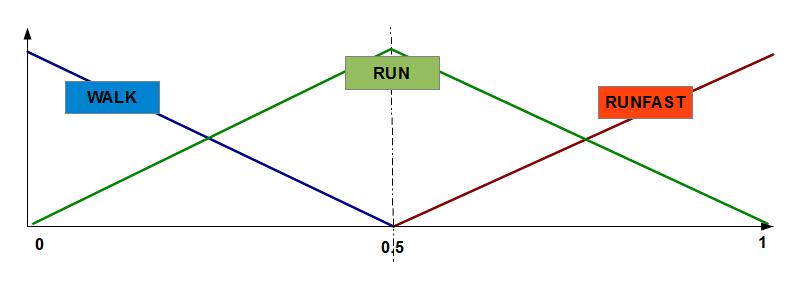
This type of animation is useful if you want to blend animations basing on a single value, for example imagine you have 3 animations: walk, run, runFast, you can build a 1D Blended animation using these 3 source animations and blend them using as blending value the speed of the character you want to animate.
To assign a value to the 1D blending parameter you can use SetAnimationBlendX function.
It is an animation that blends four or more source animations basing on two float parameters.
The float parameters values can range from 0 to 1. In this case source animations are arranged into a table, one parameter controls the blending between columns (X direction), the other controls the blending between rows (Y direction).
To assign a value to the X blending parameter you can use SetAnimationBlendX function, To assign a value to the Y blending parameter you can use SetAnimationBlendY function. As for 1D blended animations the animations are equally distributed along X and Y directions:
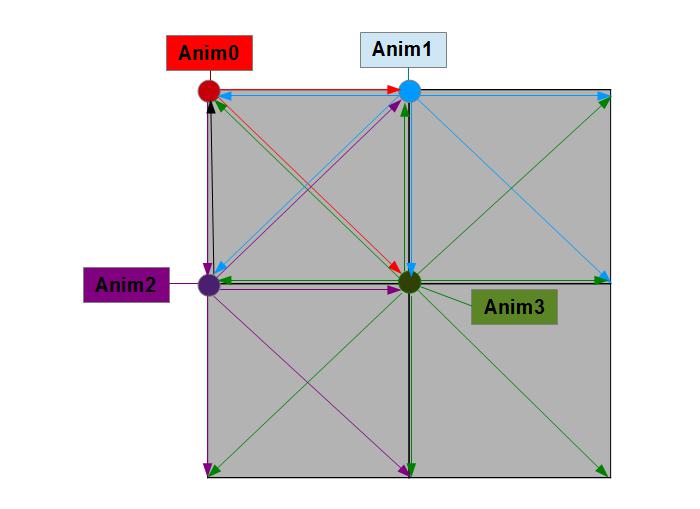
In the image above colored dots correspond to animations max values, the arrows are directions in which animation values go from max to min.
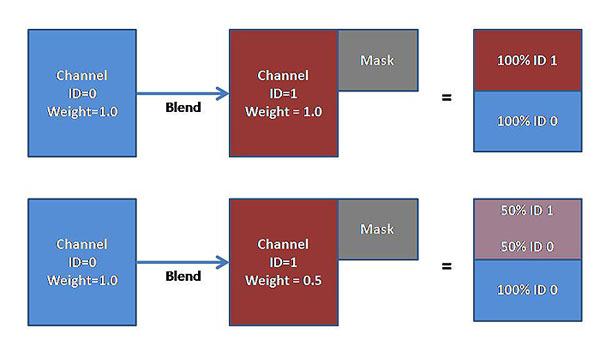
Channels are set of blended animations. Each channel is identified by an ID number. When channel plays an animation it plays the result of the blending of all its contained animations. Channels can play animations indipendently but all animations of a single channel are automatically played in sync. This is just due to the fact that channel plays the result of the interpolaion and not the single animations.
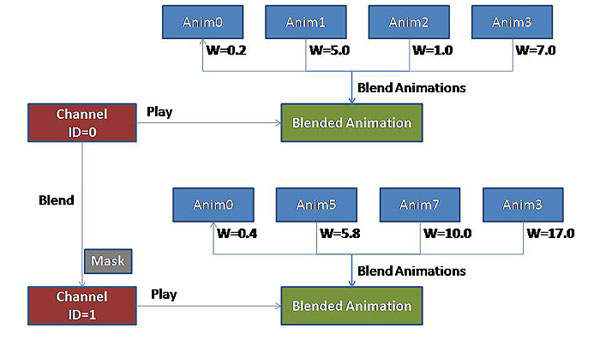
Channels are superimposed basing on their ID, from smallest to highest. This means that channel with ID 1 is superimposed to channel ID 0, 2 to 1, 3 to 2 and so on. Like animations also channels are blended but in a bit different way: channel weight go from 0.0 to 1.0 values, and if a channel has weight 1.0 and another channel has weight 1.0, the channel with higher ID wins, completely covering the smaller ID channel.
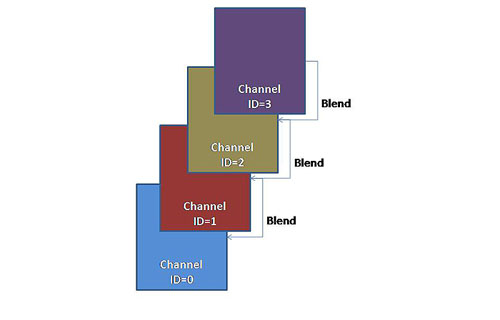
So if you want a channel appears gradually you have to lowering the weight of the higher channel mantaining to 1.0 the weight of the smaller channel.
Channels can be maskered. The mask of a channel as the same behaviour of the blending mask of a texture: only the nodes of the channel covered by the mask are updated. This means that, for example, you can apply a mask to the top side of a model and using this mask for a shoot channel of ID 1, playing a channel with ID 0 containing a walk/run animation you can blend it with a shoot channel that works only on the top side of the model: the result is that model can shoot while walking, simply changing the weight of shoot channel.
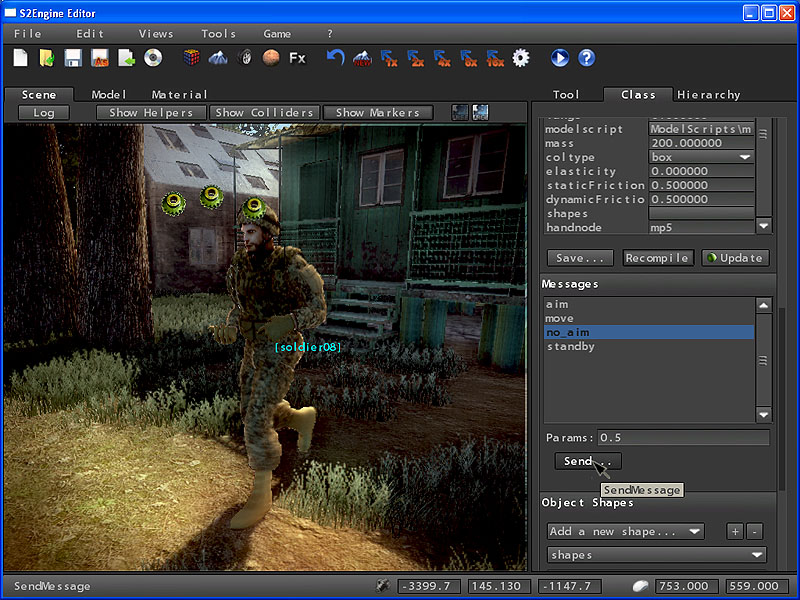
To better understand these concepts we will show a small tutorial that will let you to test some animation features inside the editor, sending messages to a scripted character. First write the script. Suppose we have a model, for example the marine model, with 4 animations: standby,run,walk and aim. We want our character pass gradually from walk to run animation basing on his velocity and we want he aim while running/walking, or aim when in standby state. Also suppose our character have a mask, named "BodyTop", that mask the top side of out character model. We set 3 channels:
To test this script open the notepad and copy the script, then save the text file as test_anim.sc2 file.
Open the editor and load The fps.bin file.
Select one marine character and replace his script with test_anim.sc2 script.
Press Recompile check button and then click on Apply button to update the character.
You will see the list of all messages exposed. Select move message and specify the velocity param into params input box, you will see character walk/run basing on param value (from 0.0, walk, to 1.0, run). Select aim message to see character aiming while walking/running, select no_aim message to return to previous state.
Animations can have some frames marked as key. You can make this inside the editor. When an animation is performed the animated entity sends a message to itself when a keyframe is reached. The name of the message is: AnimTime. The elements of content of the message are:
Then you can process the message inside the Message() function of the script associated to the animated entity.
 1.8.10
