|
S2ENGINE HD
1.4.6
Official manual about S2Engine HD editor and programming
|
|
S2ENGINE HD
1.4.6
Official manual about S2Engine HD editor and programming
|
Just like other subsystems, in S2Engine HD Physics subsystem is implemented in a separate library module. This lets us to implement more than one physics library and lets you to choose what to use. For now only one physics module has been implemented and it is based on NVIDIA Physx.
Each object in the scene can be associated to a physics object. The physics objects are managed by the physics subsystem that has its own physics rapresentation of the scene. S2EngineHD Base Plugin Module provides a set of pre-implemented objects (just like RigidBody, MeshObject, Character, Vehicle, UniversalJoint, etc...) that are already associated to a physics object but you can also associate object to physics using CustomEntity object class and Physics Functions.
Generally physics system controls physics objects position and orientation which are automatically transferred to the position and orientation of the graphical ones, this means that the position and orientation of objects aren't directly controllable. Sometimes it is needed to directly control the position and orientation of an object, even if it is associated to a physical one. In this case we set the kinematic flag of the physics object using PhysicsSetKinematicFlag (PhysicsSetRagdollKinematicFlag in the case of a ragdoll), we use PhysicsSetKinematicFlag or PhysicsResetRagdollKinematicFlag for the viceversa. When this flag is set the orientation and position of the graphical object is transferred to the physical one. This means that you can use function for rotating and traslating object, such as Rotate, Rotate2V, RotateNode, Traslate, Traslate2, for modifying either the physical and graphical object position and orientation. Sometimes it is needed that object must not collide, in this case we reset the physics object collide flag using PhysicsResetCollideFlag or PhysicsResetRagdollCollideFlag. To set collision PhysicsSetCollideFlag or PhysicsSetRagdollCollideFlag are used.
Generally during a physics simulation, when an object, on which only gravity force acts, has reached an equilibrium state, i.e. its kinetic energy has reached an epsilon value, it is automatically excluded from the simulation putting its state to sleeping, the object state will change only if the object will received an external force (of course different from gravity force). This is a common trick to speedup phyisics simulation freeing the system from useless computation. But sometime you could need to force the state of an object to sleep even if its kinetic energy hasn't reached the threshold value. In this case you can use PhysicsObjectSleep to put object in a sleeping state, and PhysicsObjectWakeUp to wakeup it. Also ragdolls can be put in sleeping state using PhysicsRagdollSleep.
These are the basic physics objects. There are 2 types of rigid body: static and dynamic.
Static Rigid Bodies can be assiciated to StaticGeom meshes just like MeshObject and DestroyableMesh, Dynamic rigid bodies can be associated to active and non-active objects using PhysicsCreateBody function. If Bodies are dynamic they need a mass, so you have to set mass param.
There are also 3 other params useful to configure the physics behaviour of the body:
When 2 dynamic bodies collide (or a dynamic body collide with a static body, or a dynamic body collide with a character or a vahicle) they receive a message from Physics system called "ContactNotify":
Name: "ContactNotify".Content: NormalizedForceVector^ForceVectorLength^CollidedObjectPos.When a dynamic body enters the water plane it receives the following message:
Name: "EnterWater".Content: Vertical velocity (float).When a dynamic body leaves the water plane it receives the following message:
Name: "ExitWater".Content: Vertical velocity (float).These message are very useful when you want script the response of the body to the contact with another body or with the water plane. In the case of RigidBody object ContactNotify and EnterWater messages are automatically processed. In other cases you have to implement them.
Example The following is an example of a CustomEntity scripted for becoming a Rigid Body.
A Vehicle class, that natively supports physics vehicle, has been already implemented. However you can make a CustomEntity become a vehicle using PhysicsCreateVehicle function. A Vehicle ia a special kind of rigid dynamic body which is composed by a body shape and wheel shapes. The creation of the body shape is similar to the creation of rigid bodies shape, also other secondary shapes can be added to the body in a similar way as Rigid bodies. On the contrary wheel shapes are computed automatically by the physics system at creation time.
A model that has to been used as vehicle need to be composed by a hierarchy objects:
you can also add other nodes as you need them.
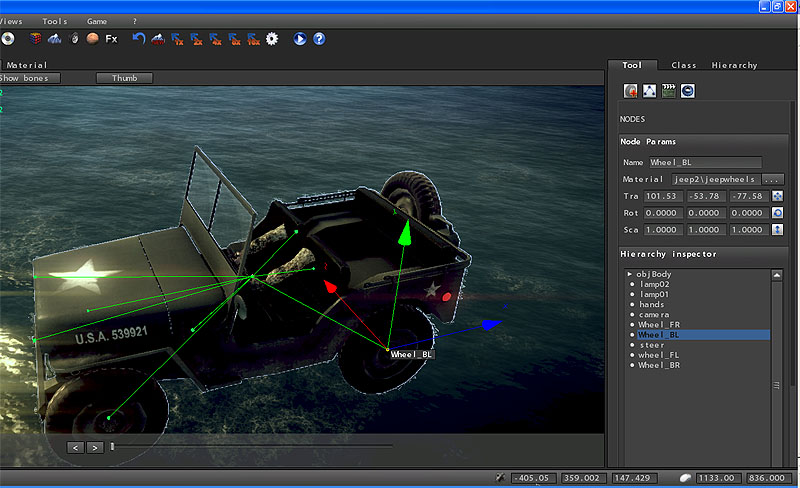
To create wheel shapes the system needs to know what are the wheels, so you have to specify the name of the wheel nodes to the PhysicsCreateVehicle function in the case you want to create a vehicle using CustomEntity, or specify them into the params of the Vehicle class object. The physics system finds the wheel nodes and then compute the physical wheel dimension basing on the bound box of the graphical wheel node object. As showed in the figure,
When vehicle collide with a dynamic body or a static one, or collide with another vehicle or a character they receive a message from Physics system called "ContactNotify":
Name: "ContactNotify".Content: NormalizedForceVector^ForceVectorLength^CollidedObjectPos.When a vehicle enters the water plane it receives the following message:
Name: "EnterWater".Content: Vertical velocity (float).When a vehicle leaves the water plane it receives the following message:
Name: "ExitWater".Content: Vertical velocity (float).These message are very useful when you want script the response of the vehicle to the contact with another physics object or with the water plane.
After creating a vehicle into the init() function (remember that if you are scripting a Vehicle class object you haven't to use the PhysicsCreateVehicle function), To make a vehicle moving you have to use the PhysicsVehicleControl function. The following is an example of scripting a Vehicle class object:

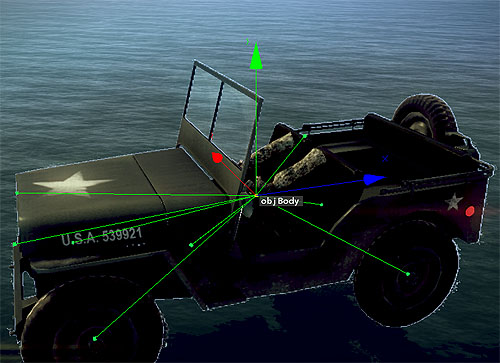
As you can see from figure the vehicle model used with the following script has a steer node representing the vehicle steering. It is orientated along the right axis (blue) so for rotating it to left or to right we have to rotate the node around rgt axis. When make physical vehicle to turn to right or left we will make also graphical steering node to rotate right or left.
Example
Generally characters aren't simulated by real physics. This is due to the fact that it is important for characters movements to be well-predictable, stable and of immediate response. S2ENGINE HD physics subsystem treats characters as capsules that can move from a start to an end position during a frame with a linear displacement function. The amount of displacement depends on the duration of a frame. Physics character, of course, can collide with vehicles, rigid and static bodies. It also, automatically can climbing stairs and stopping at slopes. A Character class, that natively supports physics character, has been already implemented. However you can make a CustomEntity become a character using PhysicsCreateCharacter function.
characters and Rigid Bodies have some common properties:
| coltype | characters allow only character collision shape type. |
| dims | dimensions of the character capsule. In this case X is the capsule radius, Y is the capsule height. |
| offset | position of the capsule respect the position of the character object (just like Rigid Bodies) . |
| mass | mass of the character. |
To move a character you have to use the PhysicsCharacterMove function.
Example
In this example we suppose you have created a CustomEntity and want to treat it as a player Character.
In S2ENGINE HD it is possible to associate physics ragdolls to Characters. Ragdoll are built basing on character model using a special Editing tool. Ones built Ragdoll can be instanced on the given character using script function PhysicsCreateRagdoll. When created Ragdolls are initially set to spleeping state and do not affect collisions. When you want character pass from keyframed animations to ragdoll you have to call the PhysicsCharacterToRagdoll function. This function wakeup ragdoll and puts its collide flag to true.
Coming soon.
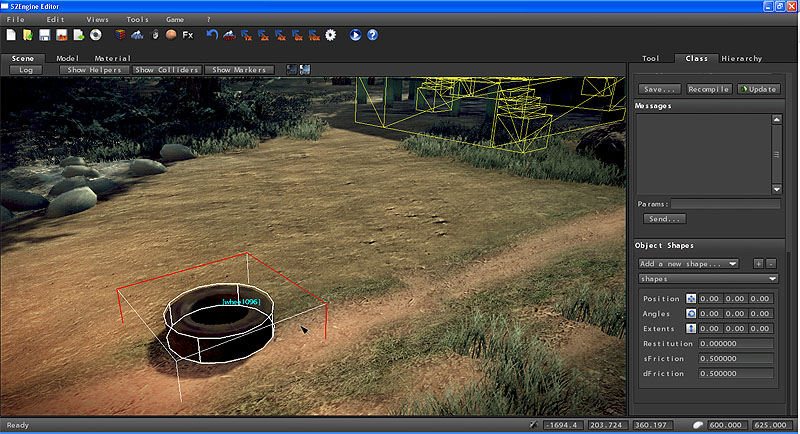
All Physics Objects can collide either with static or dynamic bodies. To collide objects need a collision shape. One or more collision shapes can be assigned to an object using editor (see Edit Shapes). The first collision shape (we call it basic collision shape) must be assigned to the object using coltype, colmesh, dims and offset params:
| coltype | the collision shape type, can be box, sphere, cylinder, character, mesh |
| colmesh | in the case coltype is mesh, this param lets you to set the filename of the collision mesh to load. |
| dims | the dimensions of the collision shape. It is a vec3 format param but not all values are used depending on the shape selected. For example box shape need X,Y,Z extensions, sphere shape needs only radius (X), cylinder needs radius(X) and height(Y), mesh has fixed dims. |
| offset | vec3 format. The position of the shape respect the origin of the object. For example an offset of "0,200,0" means that the position of the shape is 200 point upon the origin(its position in world space) of the object. |
Once you have set the basic shape for the object, you can also (but not necessarily) setup other shapes using the shapes tool in the editor.
Often in game simulation it is needed to know if something is hitted wehn an object moving in a certain direction. Think, for example, if you want to know what player collides during a punch animation, or if he hits the ground. Generally, some of these query can be made by raycasting/picking functions, but sometime it is not sufficient. Physics system makes available a set of functions for the so called sweep test. Sweep test is more robust than raycasting because, while raycasting checks the hits of a simple ray (i.e. a point extruded between two positions), sweep test checks the hits of a volume computed extruding a solid shape just like sphere or a capsule from a starting to an ending position.
In S2ENGINE HD script there are various ways to do sweep test:
Once these functions have been called you can retreive their results by calling:
 1.8.10
